
Features in the Printer Driver
Some printer drivers do not support all printer features. Use the
PCL 6 printer driver to take full advantage of all the printer’s
features, including:
Accessing the Printer Driver
After installation, you can access the printer driver through the
operating system or from your software application. Although access
to the printer driver may vary from one software application to
another, the printer driver can usually be accessed from the
File menu (choose Print or Print Setup).
Note
The method for accessing a printer driver is the same, no matter which
printer driver you are using.
z
Using the Printer Driver Help
(Windows Only)
z
Using Reduce/Enlarge
Options
z
Creating and Using
Watermarks
z
Selecting a Paper Source
z
Printing Multiple Pages on
One Sheet of Paper
(N-up Printing)
z
Optimizing for Media Types
z
Setting a Custom Paper Size
z
Restoring Default Printer
Driver Settings
z
Creating and Using Quick
Sets
z
Printing on Different Paper for
the First Page
z
Using EconoMode or Draft
Printing
z
Printing on Both Sides of
Paper (Duplexing)
z
Choosing Print Quality
Settings
z
Resolution Options: (to
maximize print quality and
speed)

ENWW
Chapter 2 Printing Tasks 53
Using the Printer Driver Help (Windows Only)
Each printer driver has help screens that can be activated from the
Help button in the printer driver. These help screens give detailed
information about the specific driver being used. Printer driver help is
separate from the software application help.
Accessing the Driver
Operating System
Temporarily Change
Settings (from a software
application)
Change Default Settings
(across all applications)
Windows 9x/NT 4.0/2000
From the File menu, click Print, and
then click Properties. (The actual
steps can vary; this is the most
common method.)
Click the Start button, point to
Settings, and then click Printers.
Right-click the printer icon, and
choose Properties. Many of the
features in NT 4.0 printer drivers
are also located on the Document
Defaults menu. Many of the features
in Windows 2000 printer drivers are
also located on the Printing
Preferences menu.
Windows XP
At the time of this publication, Windows XP was not released. Please go
to http://www.hp.com/support/lj2200_xpinfo for Windows XP
information and installation instructions.
Windows 3.x
From the File menu, click Print, click
Printers, and then click Options.
(The actual steps can vary; this is
the most common method.)
From the Windows control panel,
double-click Printers, highlight the
printer, and click Setup.
Macintosh
LaserWriter 8.3
From the File menu, select Print,
and click Options.
From the File menu, select Print,
and click Options. Click Save to
save your changes.
Macintosh
LaserWriter 8.4 and higher
From the File menu, select Print.
Click the pop-up for options you
wish to change.
From the File menu, select Print.
Click the pop-up for options you
wish to change. Click Save to save
your changes.
54 Chapter 2 Printing Tasks
ENWW
Creating and Using Watermarks
The Watermark options allow you to specify that text be placed
“underneath” (in the background) of an existing document. For
example, you may want to have large gray letters reading “draft” or
“confidential” placed diagonally across the first page or all pages of a
document. For Windows, access the Watermark options from the
Effects tab in your printer driver. For Macintosh computers, access
the Watermark options from the watermark/overlay drop-down menu
in your printer driver.
Note
If you are using Windows NT 4.0 or Windows 2000, you must have
administrator privileges to create watermarks.
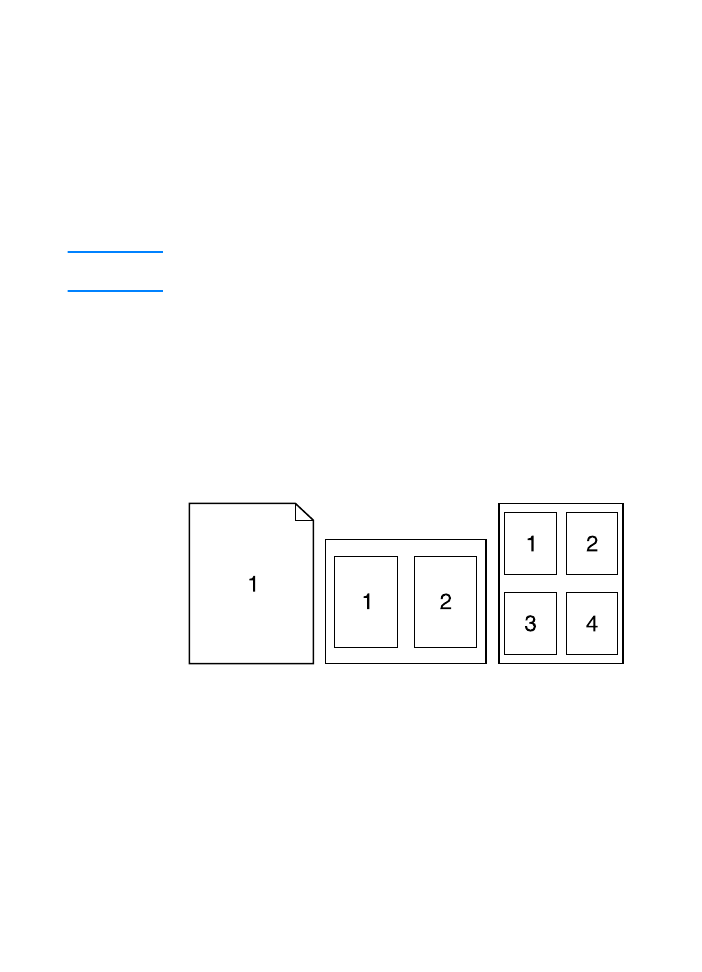
Printing Multiple Pages on One Sheet of Paper
(N-up Printing)
You can select the number of pages you want to print on a single
sheet of paper. If you choose to print more than one page per sheet,
the pages will appear decreased in size and arranged on the sheet.
You can specify up to 9 pages. Access N-up printing from the
Finishing tab in your printer driver.

ENWW
Chapter 2 Printing Tasks 55
Setting a Custom Paper Size
Use the Custom Paper feature to print on paper sizes other than
standard sizes. Access the Custom Paper feature from the Paper tab
in your printer driver.
For Macintosh computers, go to File Menu, select Page Setup, and
from the Page Attributes drop down menu, select Custom Page Size.
Click New to create a named custom page size. The new custom
page will automatically be added to the Page Size menu in
Page Setup.
Creating and Using Quick Sets
Quick Sets allow you to save the current driver settings (for
example, page orientation, n-up printing or paper source) for reuse.
For convenience, Quick Sets can be selected and saved from most
printer driver tabs. You can also restore printer driver default settings
by selecting Defaults from the Quick Sets drop-down list. Access
Quick Sets from the Finishing tab in your printer driver.
Note
If you are using Windows NT 4.0 or Windows 2000, you must have
administrator privileges to save Quick Sets.
Using EconoMode or Draft Printing
EconoMode (or draft printing) allows the printer to use less toner
on each page. Selecting this option may extend the life of your toner
cartridge and reduce your cost per page, but will reduce print quality.
Access EconoMode from the Finishing tab in your printer driver.
Note
For non-Windows operating systems, this feature is available through
HP Web JetAdmin (see HP Web JetAdmin).

56 Chapter 2 Printing Tasks
ENWW
Choosing Print Quality Settings
If you need advanced print quality, you can choose custom settings.
Access the print quality settings from the Finishing tab in your printer
driver.
Resolution Options:
z
Best Quality - ProRes 1200 for the best print quality.
z
Faster Printing - FastRes 1200, alternate resolution for complex
graphics or faster output.
z
Custom - Allows you to specify print quality settings.
Note
Changing resolution may change the formatting of your text.
Using Reduce/Enlarge Options
Reduce/Enlarge options allow you to scale your document to a percent
of its normal size. You can also choose to scale your document to fit on
any size of paper supported by the printer. Access Reduce/Enlarge
options from the Effects tab in your printer driver.
Selecting a Paper Source
If your application supports printing paper by source, make the
selections from your application. Application settings override printer
driver settings. To select a paper source from your printer driver,
access Source from the Paper tab. For Macintosh computers, select a
paper source from the General options in your printer driver.
Optimizing for Media Types
If you are printing on thin or heavy paper, transparencies, or labels,
optimize the printer for these media types. Access the optimizing
feature from the Paper tab in your printer driver. For Macintosh
computers, access the optimizing feature from the General options
in your printer driver.
Note
For non-Windows operating systems, this feature may be available
through HP Web JetAdmin (see HP Web JetAdmin).
Restoring Default Printer Driver Settings
To restore default printer driver settings, click Defaults in the Quick
Sets box of your printer driver.

ENWW
Chapter 2 Printing Tasks 57
Printing on Different Paper for the First Page
Printing on different paper for the first page of a print job is available
only with the HP PCL 6 printer driver and the Macintosh LaserWriter
driver. Access this feature from the Paper tab in your printer driver.
For Macintosh computers, access this feature from the General
options in your printer driver.
Some applications may also have this feature. Check with the
application’s help.
Note
The paper size for all pages of the print job must be the same in the
driver. However, if the application supports printing on different paper
for the first page, the settings in the application will override the driver.

58 Chapter 2 Printing Tasks
ENWW